Category: Powershell


Windows PowerShell® Web Access is a new feature in Windows Server® “8” Beta that acts as a Windows PowerShell gateway, providing a web-based Windows PowerShell console that is targeted at a remote computer. It enables IT Pros to run Windows PowerShell commands and scripts from a Windows PowerShell console in a web browser, with no Windows PowerShell, remote management software, or browser plug-in installation necessary on the client device. All that is required to run the web-based Windows PowerShell console is a properly-configured Windows PowerShell Web Access gateway, and a client device browser that supports JavaScript® and accepts cookies.

Examples of client devices include laptops, non-work personal computers, borrowed computers, tablet computers, web kiosks, computers that are not running a Windows-based operating system, and cell phone browsers. IT Pros can perform critical management tasks on remote Windows-based servers from devices that have access to an Internet connection and a web browser.

After successful gateway setup and configuration, users can access a Windows PowerShell console by using a web browser. When users open the secured Windows PowerShell Web Access website, they can run a web-based Windows PowerShell console after successful authentication.

Windows PowerShell Web Access setup and configuration is a three-step process:

  1. Step 1: Installing Windows PowerShell Web Access
  2. Step 2: Configuring the gateway
  3. Step 3: Configuring authorization rules and site security

Before you install and configure Windows PowerShell Web Access, we recommend that you read both this topic and Use the Web-based Windows PowerShell Console, which describes how users sign in to the web-based console, and some of the limitations and differences in the console. End users of the web-based console should read Use the Web-based Windows PowerShell Console, but do not need to read this topic.

This topic does not provide in-depth Web Server (IIS) operations guidance; only those steps required to configure the Windows PowerShell Web Access gateway are described in this topic. For more information about configuring and securing websites in IIS, see the IIS documentation resources in the See Also section.

The following diagram shows how Windows PowerShell Web Access works.

Windows PowerShell Web Access diagram

More information on Technet : Deploy Windows PowerShell Web Access

Using PowerShell it is easily to retrieve a nice overview of disk size (GB) and free disk space (GB) from multiple servers. With such a script it is possible to analyze trends in disk usage over a specified period.

Step 1

Create a directory (for example “C:\Log”) with a file called “Servers.txt” in it.
List all servers within the text file where you want to retrieve the disk usage from.

Servers

Step 2

Start PowerShell and run the PowerShell command as specified below.

PowerShell

Get-WmiObject Win32_LogicalDisk -filter “DriveType=3″ -computer (Get-Content .\Servers.txt) | Select SystemName,DeviceID,VolumeName,@{Name=”Size(GB)”;Expression={“{0:N1}” -f($_.size/1gb)}},@{Name=”FreeSpace(GB)”;Expression={“{0:N1}” -f($_.freespace/1gb)}} | Out-GridView

Step 3

You will get an overview of disk usage from all listed servers. From this grid you can cut and paste all the information into a spreadsheet to make alternate calculations and graphs.

Disk size overview

How do you find out when was the last time a particular user logged on?

(Get-QADUser username).lastLogon looks like an obvious answer but there are a few gotchas to be aware of.

The main of them: lastLogon attribute is actually not replicated between domain controllers so if you have more than one DC (which I am sure you do) you need to get it from all of them and get the latest of them.

Here’s the PowerShell code which does that:

Get-QADComputer -ComputerRole DomainController | foreach {
(Get-QADUser -Service $_.Name -SamAccountName username).LastLogon
} | Measure-Latest

Basically, we are getting a list of all DCs in the company, then prompting each of them for the user’s lastLogon time, and then picking the latest of the values (I am using my Measure-Latest function – just copy/paste if before executing this command or put in your script.)

Note that there are utilities which can do that querying and comparison for you. NetWrix guys even have a PowerShell cmdlet described here, so you can do something like:

Get-NCInactiveUsers -domain example.com -days 15

You should also keep in mind that if your users do not log off and simply lock their workstations they do not log on either – Kuma is describing here how he has a script logging off users every night to avoid this.

Another alternative is using lastLogonTimeStamp attribute instead. This one does indeed get replicated. It was introduced in Windows 2003 (make sure your schema is 2003-level or later). But keep in mind that this one is not real-time as it is only replicated every 9-14 days.

So as long as you are looking for users who have not logged on for something bigger than 2 weeks you should be good using Shay’s script for locating inactive users:

$now=get-date
$daysSinceLastLogon=60

Get-QADUser -sizeLimit 0 | where {
  $_.lastlogontimestamp -and 
    (($now-$_.lastlogontimestamp).days -gt $daysSinceLastLogon)
} | Format-Table Name, LastLogonTimeStamp

Finally, you can speed things up considerably by constructing an LDAP query and thus doing all the filtering on the server side:

# calculate a deadline date. (now minus 60 days)
$deadline = (Get-Date).AddDays(-60).ToFileTimeUtc()

#construct a ldap query
$ldapQuery = '(|(!(lastLogonTimeStamp=*))(lastLogonTimeStamp<=' + $deadline + '))'

#run this query
Get-QADUser -Enabled -SizeLimit 0 -LdapFilter $ldapQuery

How do you put PowerShell code into a batch/cmd file without having to also have a separate .ps1 file? (If you can have an external .ps1 file – you just invoke powershell.exe and supply the path to the script file as parameter.)

The problem is that PowerShell syntax can obviously have elements that .bat files cannot stand, and that you cannot pass multiline script as powershell.exe parameter.

There are actually a couple of ways to do so:

1. Encode the script:

As Bruce points here PowerShell has the -EncodedCommand parameter, which lets you pass any PowerShell code as base-64-encoded string.

So if you have some sort of script, like this:

#iterate numbers 1 through 10
1..10 | foreach-object {
# just output them
"Current output:"
$_
}

You simply (in PowerShell command-line or script) put it in curcly brackets and assign (as scriptblock) to a variable:

$code = {
    #iterate numbers 1 through 10
    1..10 | foreach-object {
    # just output them
    "Current output:"
    $_
    }
}

Then use this PowerShell command to get the encoded version:

[convert]::ToBase64String([Text.Encoding]::Unicode.GetBytes($code))

Then copy/paste the output of the command to your batch file:

powershell.exe -EncodedCommand DQAKAAkAIwBpAHQAZQByAGEAdABlACAAbgB1AG0AYgBlAHIAcwAgADEAIAB0AGgAcgBvAHUAZwBoACAAMQAwAA0ACgAJADEALgAuADEAMAAgAHwAIABmAG8AcgBlAGEAYwBoAC0AbwBiAGoAZQBjAHQAIAB7AA0ACgAJACMAIABqAHUAcwB0ACAAbwB1AHQAcAB1AHQAIAB0AG
gAZQBtAA0ACgAJACIAQwB1AHIAcgBlAG4AdAAgAG8AdQB0AHAAdQB0ADoAIgANAAoACQAkAF8ADQAKAAkAfQANAAoA

2. Keep the code as PowerShell but turn it to a string:

If the first approach for whatever reason does not work for you (e.g. you care about readability), you can try to flatten the script and pass it as a string:

  1. Take the PowerShell script.
  2. Remove all the comments ( everything that starts with #).
  3. Put ; at the end of each line.
  4. Remove all line breaks.
  5. Supply the string you get as the -command parameter for powershell.exe.

The reason for all of this is that powershell.exe (the executable which allows you to run any PowerShell code allows you to either start an external .ps1 script file (which often creates additional complexity of having to maintain and ship 2 files) or execute a single line of PowerShell code as the -command parameter. Hence the requirement to flatten the script and turn something like this:

#iterate numbers 1 through 10
1..10 | foreach-object {
# just output them
"Current output:"
$_
}

into:

powershell.exe -command '1..10 | foreach-object { "Current output:"; $_; }'

1. Get your script ready

Surprising as it might sound, your script might actually not be ready to run in a scheduled task as is. This happens if it uses cmdlets from a particular PowerShell module or snapin, and it worked for you interactively because you used a specialized shell (e.g. Exchange Management Shell) or a tool like PowerGUI Script Editor which loads the modules for you.

If you indeed are using using any non-default cmdlets, simply add Add-PSSnapin or Import-Module to the beginning of the script. For example:

Add-PSSnapin Quest.ActiveRoles.ADManagement

2. Schedule the task

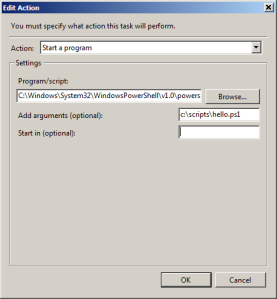
To schedule a task simply start Windows Task Scheduler and schedule powershell.exe executable passing the script execution command as a parameter. The -File parameter is the default one so simply specifying the script path as the argument would work in a lot of cases:

You can find powershell.exe in your system32\WindowsPowerShell\v1.0 folder.

4. Report task success or failure

If you want your script to report success or failure (or some sort of other numerical result) simply use the exit keyword in the script to pass the value, e.g.:

exit 4

Then your Windows Task Scheduler will show the value in the Last Run Result (you might need to hit F5 to refresh the column in the task scheduler):

3. Passing parameters

If you need to pass parameters things get a little trickier. Say, you have a script which adds two numbers:

param($a=2, $b=2)
"Advanced calculations ahead"
exit $a + $b

To pass the numbers as parameters, you would want to use powershell.exe -Command instead of powershell.exe -File. This -Command argument will then have the script invocation operator &, path to the script, and the parameters. E.g.:

Program:C:\Windows\System32\WindowsPowerShell\v1.0\powershell.exe
Add argument (optional)-Command "& c:\scripts\hello.ps1 -a 2 -b 3"

If you want to also get your exit code from the script, you would need to re-transmit that by adding exit $LASTEXITCODE to the command. E.g.

Program:C:\Windows\System32\WindowsPowerShell\v1.0\powershell.exe
Add argument (optional)-Command "& c:\scripts\hello.ps1 -a 2 -b 3; exit $LASTEXITCODE"

5. Run x86 PowerShell on x64 Windows

On 64-bit versions of Windows you actually have both 64-bit and 32-bit versions of PowerShell. In most cases you don’t care but in some cases (e.g. specific COM objects being used) you might need specifically a 32-bit version. To get that to run, simply pick the proper executable when you schedule the task:

Regular PowerShell (64-bit version on 64-bit Windows):%SystemRoot%\system32\WindowsPowerShell\v1.0\powershell.exe

32-bit PowerShell (x86):%SystemRoot%\syswow64\WindowsPowerShell\v1.0\powershell.exe