
Measuring the Infrastructure Efficiency of Virtual Environments
Top 20 VMware Performance
Metrics You Should Care About
Measuring the Infrastructure Efficiency of Virtual Environments
Top 20 VMware Performance
Metrics You Should Care About
VmkCtl Locking (/etc/vmware/esx.conf) : Unable to create or open a LOCK file. Failed with reason: No space left on device
VmkCtl Locking (/etc/vmware/esx.conf) : Unable to create or open a LOCK file. Failed with reason: No space left on device
cpu4:1969403)WARNING: VisorFSObj: 893: Cannot create file /etc/vmware/esx.conf.LOCK for process python because the visorfs inode table is full.
cpu11:1968837)WARNING: VisorFSObj: 893: Cannot create file /etc/vmware/esx.conf.LOCK for process hostd because the visorfs inode table is full.
cpu5:1969403)WARNING: VisorFSObj: 893: Cannot create file /etc/vmware/esx.conf.LOCK for process python because the visorfs inode table is full.
cpu11:1968837)WARNING: VisorFSObj: 893: Cannot create file /etc/vmware/esx.conf.LOCK for process hostd because the visorfs inode table is full.
/etc/init.d/sfcbd-watchdog stop
To remove these files, run this command:
# cd /var/run/sfcb
# rm [0-2]*
# rm [3-6]*
# rm [7-9]*
# rm [a-c]*
# rm [d-f]*
/etc/init.d/sfcbd-watchdog start
Source: VMware KB
This a GUI that allows you to Backup ESXi 5.0 or ESXi 5.1 hosts to a destination of your choice on a local drive. It also allows you to restore ESXi Host configuration bundle backups taken, to other Hosts.
The main improvement introduces a function in the script which backs the GUI to check that ESX hosts are valid before attempting to backup or restore these.
Very cool tool and useful:
Port 80 – vCenter Server requires port 80 for direct HTTP connections. Then the port 80 redirects requests to HTTPS port 443. Of course you can directly access through the HTTPs, but this redirection can be helpfull if accessing in clear through http only.
Side Note: Make sure that you don’t conflict with IIS or other webservers, which might also use port 80. You can use NETSTAT with the “–abo” switch to determine which ports are used. Or you can also use Process Explorer tool provided by Windows Sysinternals http://technet.microsoft.com/en-us/sysinternals/bb896653
Port 389 – This is the LDAP port number for the Directory Services (DS) for the vCenter Server group. If there is another service, you might be wanting to change that. The LDAP service can run different ports. Here is the range: 1025 – 65535. The vCenter Server system needs to bind to port 389, even if you are not joining this vCenter Server instance to a Linked Mode group.
Port 443 – This is the default port where vCenter Server listens. If not already, open the firewall port. This port (443) is also used for monitoring the data tranfer from SDK clients. You might want to use other port for https. In this case use https://<ip-of-your-vcenter-server>:port-number. Example : https://10.10.7.23:444
Port 636 – This port is used in case you’re using vCenter Server in Linked Mode, where this is the SSL port of the local instance. In case you’re conflicting with another port, you might want to change the other port to different one. If another service is running on this port, it might be preferable to remove it or change its port to a different port.
Port 902 – This is the default vCenter server port. vCenter server uses this port to send data to managed hosts, which also uses this port to send heartbeat (through UDP).
Port 903 – Used for diplay the VMs console. It must be opened between the vSphere Client and the hosts.
Port 8080 – This port is used for the VMware VirtualCenter Management Web Services (windows service).
Port 8443 – This port is used for the VMware VirtualCenter Management Web Services.(on SSL).
Port 60099 – Web Service change service notification port
Port 6501 – Auto Deploy Service
Port 6502 – Auto Deploy management
Port 7444 – vCenter Single Sign On HTTPS
Port 7005 – vCenter Single Sign On Base shutdown port
Port 7080 – vCenter Single Sign On HTTP port
Port 7009 – vCenter Single Sign On AJP port. For more information, see the documentation page onConfiguring VMware Tomcat Server Settings in vCenter Server 5.1
Port 9443 – vSphere Web Client HTTPS
Port 9090 – vSphere Web Client HTTP
Port 10080 – vCenter Inventory Service HTTP
Port 10443 – vCenter Inventory Service HTTPS
Port 10111 – vCenter Inventory Service Management
Port 10109 – vCenter Inventory Service Linked Mode Communication
More information at kb.vmware
The original ESXi system provided by VMware is made up of multiple software packages (currently 60 for ESXi 5.0 and 65 for ESXi 5.1) called VIBs (VMware Installation Bundles). There is e.g. one large VIB for the base system (esx-base), one for the VMware Tools (tools-light), and most of the remaining VIBs are hardware device drivers (e.g. net-e1000 or sata-ahci).
With an ESXi patch one or multiple of these VIBs are updated (or in very rare cases added). An example: The latest patch for ESXi 5.0 (ESXi-5.0.0-201209001 of Sep 2012) updates the VIBsesx-base, tools-light and misc-drivers.
ESXi patches are provided by VMware in the format of so-called Offline Bundles (in this case also called Patch Bundles) in ZIP format.
Now the most important point to understand is that these Patch Bundles do not only include the patched/updated VIBs, but all VIBs that make up an ESXi system, and in fact the latest version of them all.
Read more about this at v-front.de
1 |
VMware-SSO-Server.exe /S /v" /L*v \"%temp%\vim-sso-msi.log\" /qn" |
You can then open %temp% folder in Windows Explorer and monitor the automatic upgrade from here. You will find the log file and a temporary sub-directory. When that directory will disappear, the installation will be completed. Check the log to be sure the upgrade was completed successfully.
A new version of the vSphere vCenter Server has been released to address some of the issues encountered with various scenarios of deploying and operating the 5.1.0 version. This release is a full version and you can upgrade from 4.0-5.1GA to 5.1.0A
vCenter Server™ Appliance 5.1.0a | 25 Oct 2012 | Build 880472
This release of VMware vCenter Server 5.1.0a includes a number of bug fixes that have been documented in theResolved Issues section.
For instructions about upgrading vCenter Server and ESX/ESXi hosts, see the vSphere Upgrade documentation.
Resolved Issues
This issue is resolved in this release. If you have encountered this issue in the past, upgrading to vCenter Server 5.1.0a will resolve the issue.
This issue is resolved in this release.
Invalid solution certificate. Certificate already expired. error message occurs when upgrading to vCenter Server 5.1 and registering the vCenter Server instance to vCenter Single Sign On This issue is resolved in this release.
The following messages appear in the vCenter Server logs while the service is starting:
[SSO] [SsoAdminFacadeImpl] [FindGroup]
[UserDirectorySso] GetUserInfo (DOMAIN\ *USER OR GROUP*, true) res: DOMAIN\ *USER OR GROUP*
[UserDirectorySso] NormalizeUserName (DOMAIN\ *USER OR GROUP*, false) re: DOMAIN\ *USER OR GROUP*
This issue is resolved in this release.
Error 29107. The service or solution user is already registered. Check VM_ssoreg.log in system, temporary folder for details.
This issue is resolved in this release.
Could not contact Lookup ServiceError 29102 . Could not contact Lookup Service. Please check VM_ssoreg.log in system temporary folder for details.
This issue is resolved in this release.
Unable to create database users: Password validation failedError 29114. Cannot connect to DB
This issue is resolved in this release.
This issue is resolved with this release.
Storage vMotion is not licensed on this host.
To perform this migration without a license, power off the virtual machine.
This issue is resolved in this release
Source: blogs.vmware.com
Usually the patching of VMware vSphere Cluster is done through vSphere Update Manager (VUM), but for this you need vCenter. In case you’re managing single ESXi host without vCenter, you might be interested to know how to patch the ESXi host from the command line.
No need to say that I’m supposing that you don’t use vCenter in purpose, and so that you want to patch your ESXi 5 standalone host or that you want to patch VMware ESXi 5 Free version without VUM.
Otherwise it’s much more convenient using VUM which can automate the patching process by using vMotion to move the running VMs to other hosts inside of the cluster, putting the host which you want to patch into maintenance mode and do the restart.
The patching of VMware ESXi 5 is quite straightforward process, but there is one condition: SSH access
The SSH access can be easily enabled by using the VMware vSphere client through the GUI.
Yes, there is step 0 actually. How to do it? Simple:
– Through vSphere client click on the VMware ESXi 5 server > Confiure > Security Profile (services)
– SSh > Options >

Via the vSphere Datastore browser upload the patch which you have downloaded from VMware Patch Website. This website lists all VMware ESXi Patches.
During the copy operation which can take some time, you have plenty of time to gracefully shut down all your VMs which runs at the moment on your host.

I have created a sub-folder for that purpose.
Putty is the most known SSH client.
Run this command and wait, because the decompression and installation take some time……
esxcli software vib install -d /vmfs/volumes/<YOUR VOLUME>/<NAME OF PATCH FILE>.zip
In my case, I executed this command:

The process will probably take some time.
You should see this screen confirming the installation and requiring the reboot of the host. You can click to enlarge.

Now when you reboot, the system will probably complain that the maintenance mode hasn’t been enabled….
And you should see the version number change on your VMware ESXi 5 host.

Source: vladan.fr
Registering a virtual machine with the hypervisor is a handy tool that can be used when moving VMs between hosts, changing storage locations or even manual creation of virtual machines. Hyper-V 3 in Windows Server 2012 has some new advanced features for registering a virtual machine and options for importing them into Hyper-V.
To get started, launch Hyper-V Manager, select your host in the left node, right-click and select Import Virtual Machine. The Import Virtual Machine wizard launches and you are presented with the “before you begin” welcome screen; click the Next button to continue.
The next screen (Fig. 1) will prompt you to specify the current location of the VM files that you want to import. Enter the correct value and click Next to continue. You will then be prompted to select the virtual machine you wish to import from the location you specified earlier. This is relevant in case that location has more than one virtual machine stored on it. Select your VM and click Next to continue.
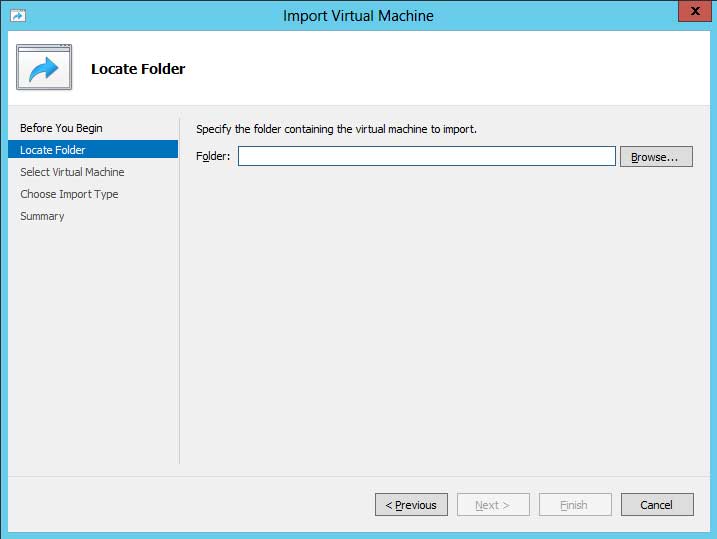 |
| Figure 1. Locate Folder. (Click image to view larger version.) |
Up next is the import type (Fig. 2) and that is essentially the heart of the import process.
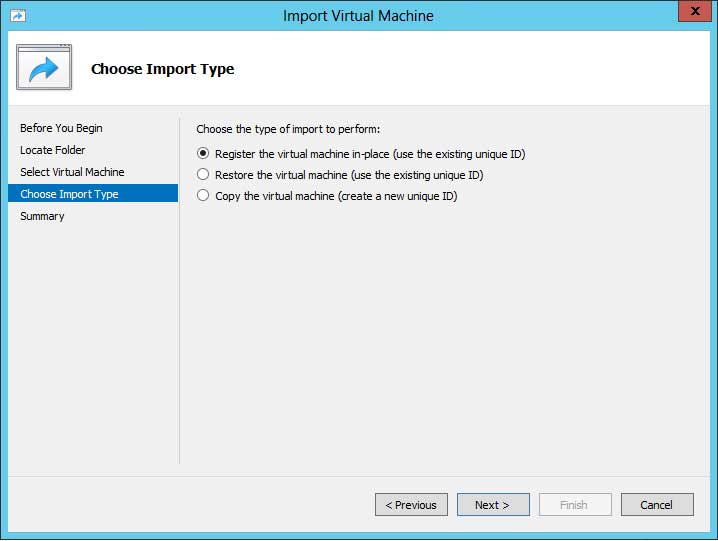 |
| Figure 2. Choose Import Types. (Click image to view larger version.) |
You should make your selection after you have understood what each option does as follows:
Register — This option assumes that the VM and its files are in the right place and that you simply need to register the VM’s unique ID with Hyper-V. This could come in handy if you bring up a new Hyper-V host and for whatever reason or circumstance you present the storage to Hyper-V and you need to manually register the VMs on that storage. The unique VM ID is preserved and does not change in this option.
Restore — This option is handy if you have your VM files stored on a file share somewhere or maybe even on a removable disk and you need to register the VM’s unique ID with Hyper-V, but also need to move the files from the current storage location into a more appropriate location. This option will copy the files and will register the VM, all the while preserving the VM unique ID.
Copy — This can come in handy when you are manually copying the VM files for the purpose of creating a new VM. Essentially you are using the “template” approach, except you are doing it manually. In this case using the Copy command will generate a new unique ID for the VM you are creating out of the copy process.
Source: virtualizationreview
